初参加。SRE Kaigi 2026
rainとAmazon Bedrock(Anthropic Claude)で、AIの力を借りてCloudFormationのテンプレートを作る
きっかけはこちらのウェビナー動画より。
https://youtu.be/pAmP3WFQ2Ss?si=AdYOseOpzxJh4ORP&t=698
rainにてAmazon BedrockのClaude2モデルを使って生成AIによるテンプレート作成ができると聞いて、すごく便利そうなので試してみました。
その際のメモを記していきます。
必要なこと
プロンプトを投げてYAMLを生成できるようにするまでの事前準備としては以下の作業が必要でした。
- Amazon BedrockのAnthropic Claudeモデルの利用申請
- rainのコマンドラインのインストール
では、それぞれ見ていきましょう。
Anthropic Claudeモデルの利用申請
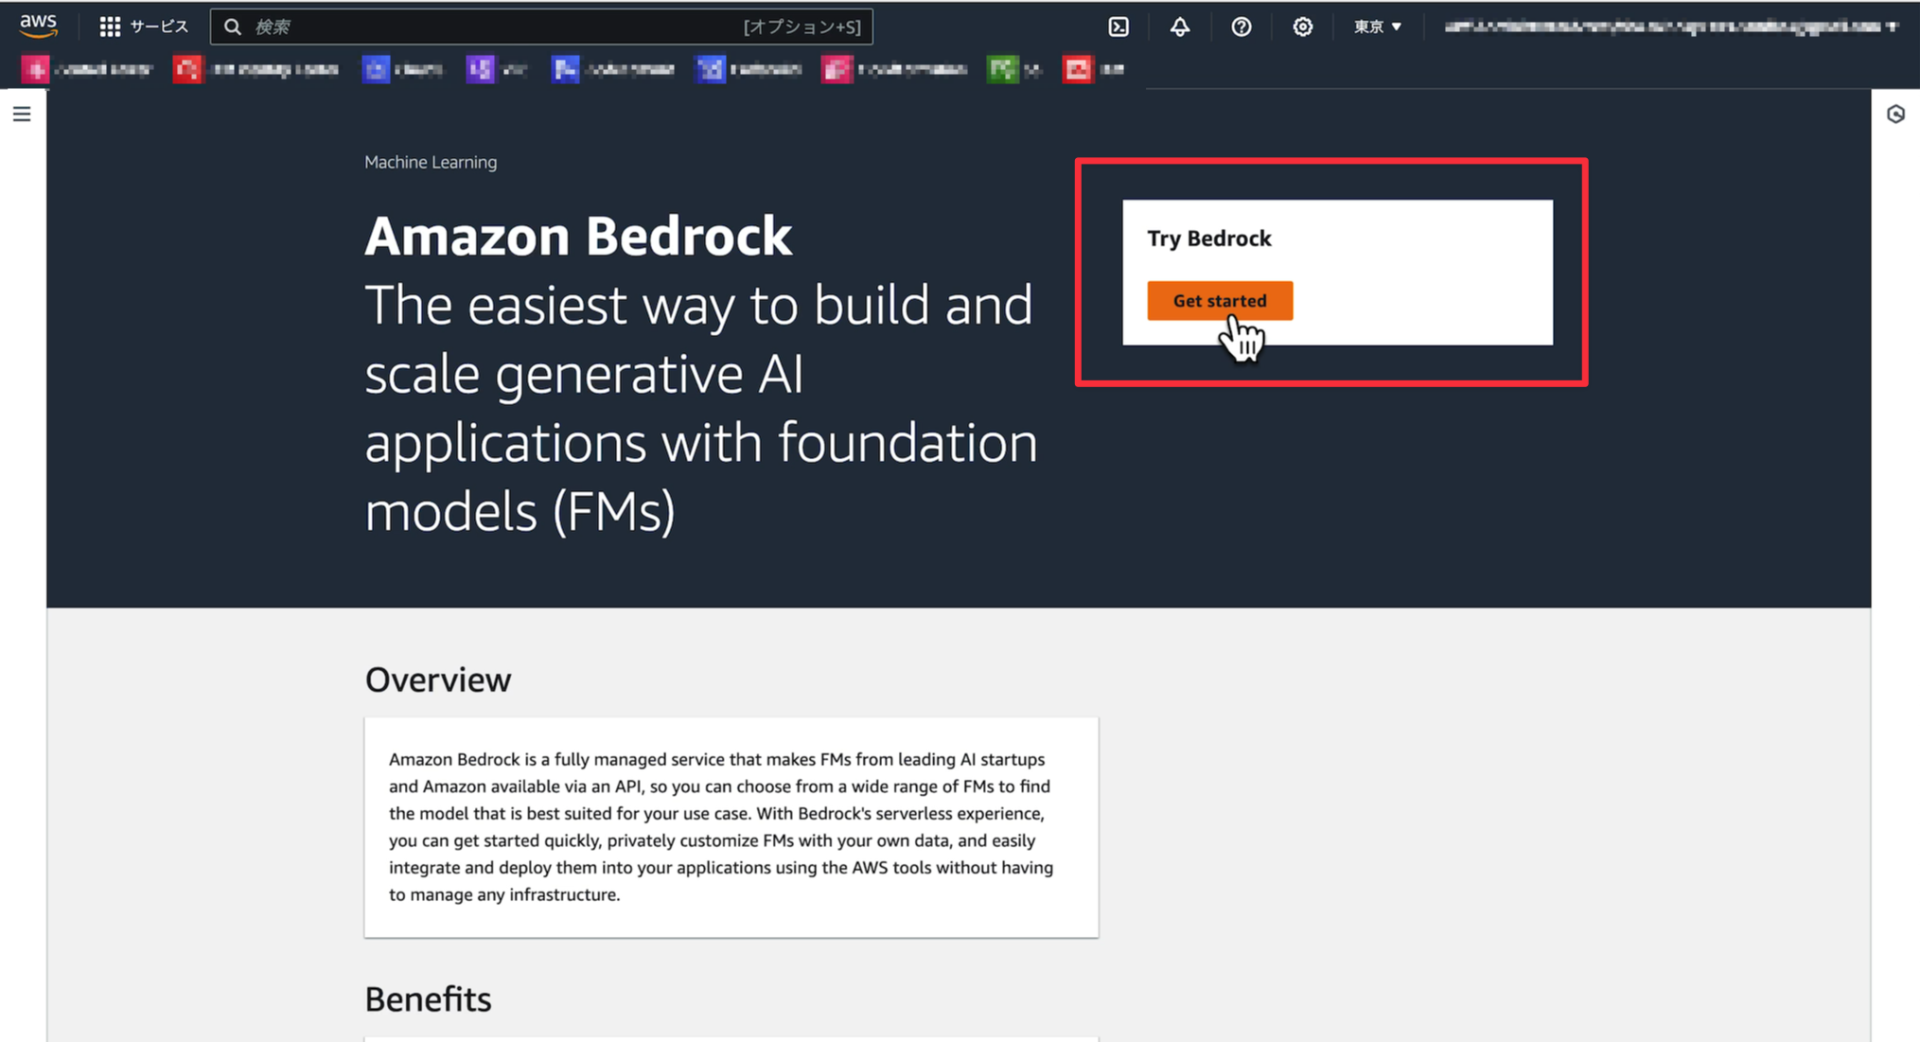
Welcome画面からGet startedのボタンを押して進めていきましょう。
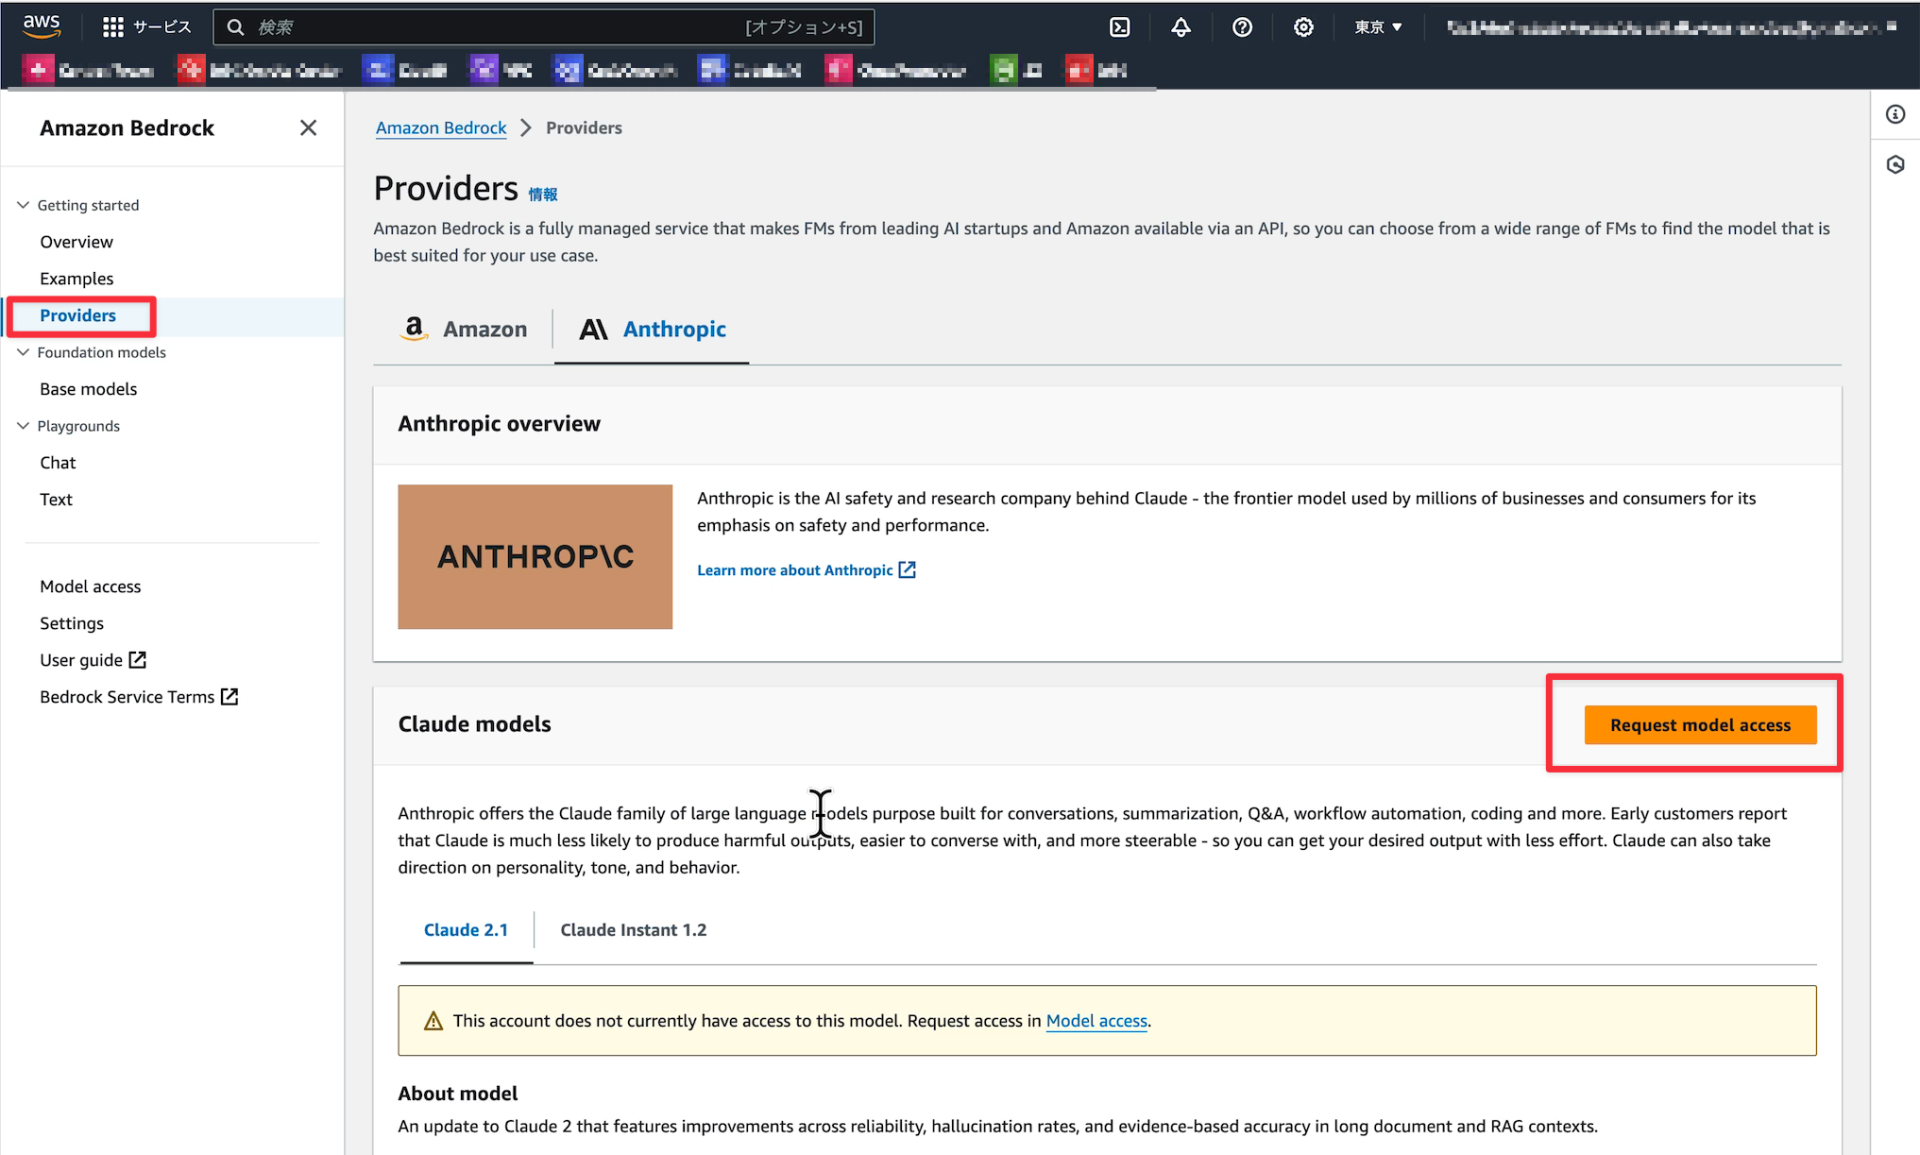
次に”Providers”の画面を開いてAnthropicのClaudeモデル画面で”Request model access”を押します。
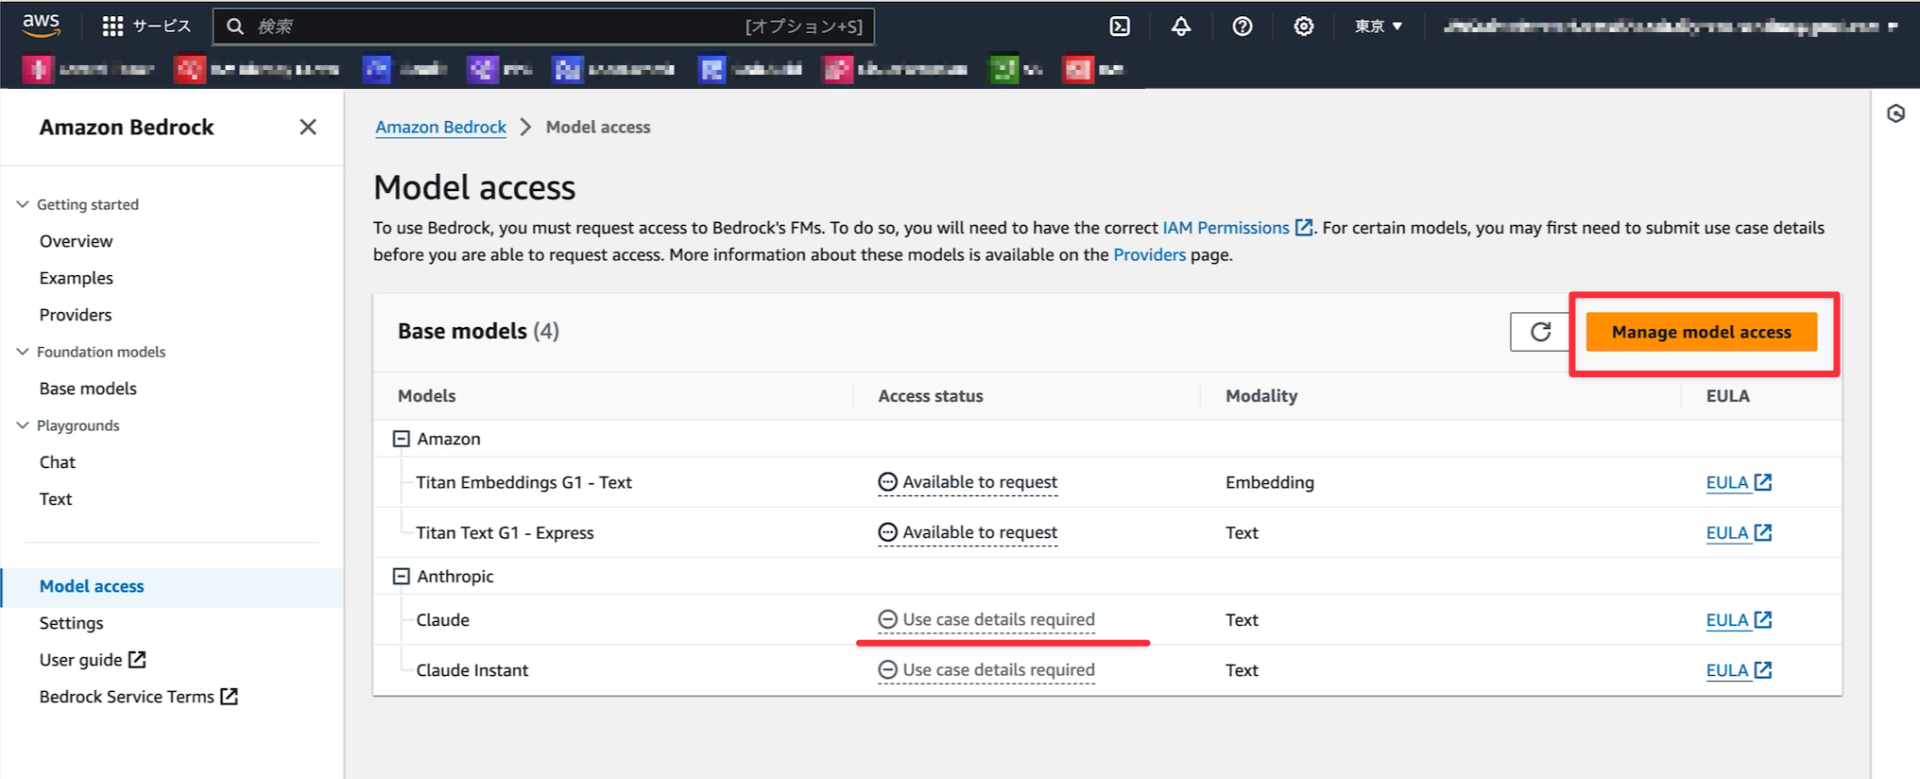
モデルの一覧画面になり、Anthropicのモデルがそれぞれ “Use case details required”となっています。利用開始するためにはそのモデルのユースケースを送信する必要があります。
“Manage model access”のボタンを押します。
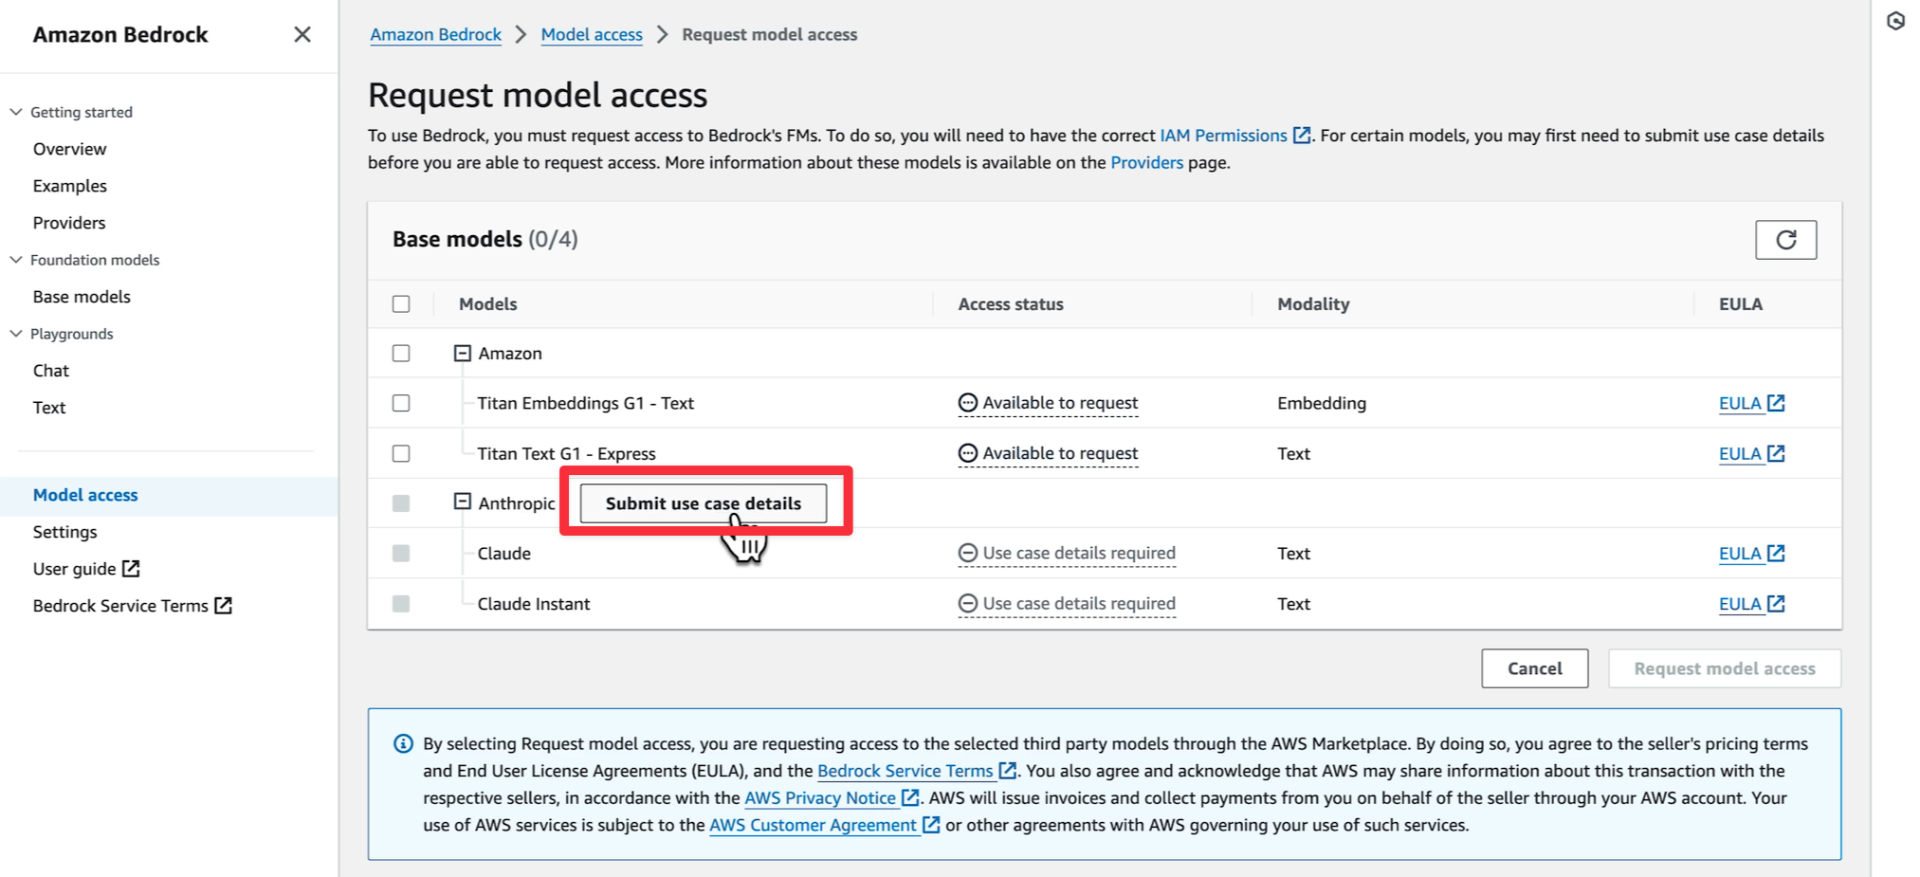
すると”Submit use case details”のボタンがProvider名の横に現れるので、ボタンを押してユースケース詳細の送信画面に遷移します。
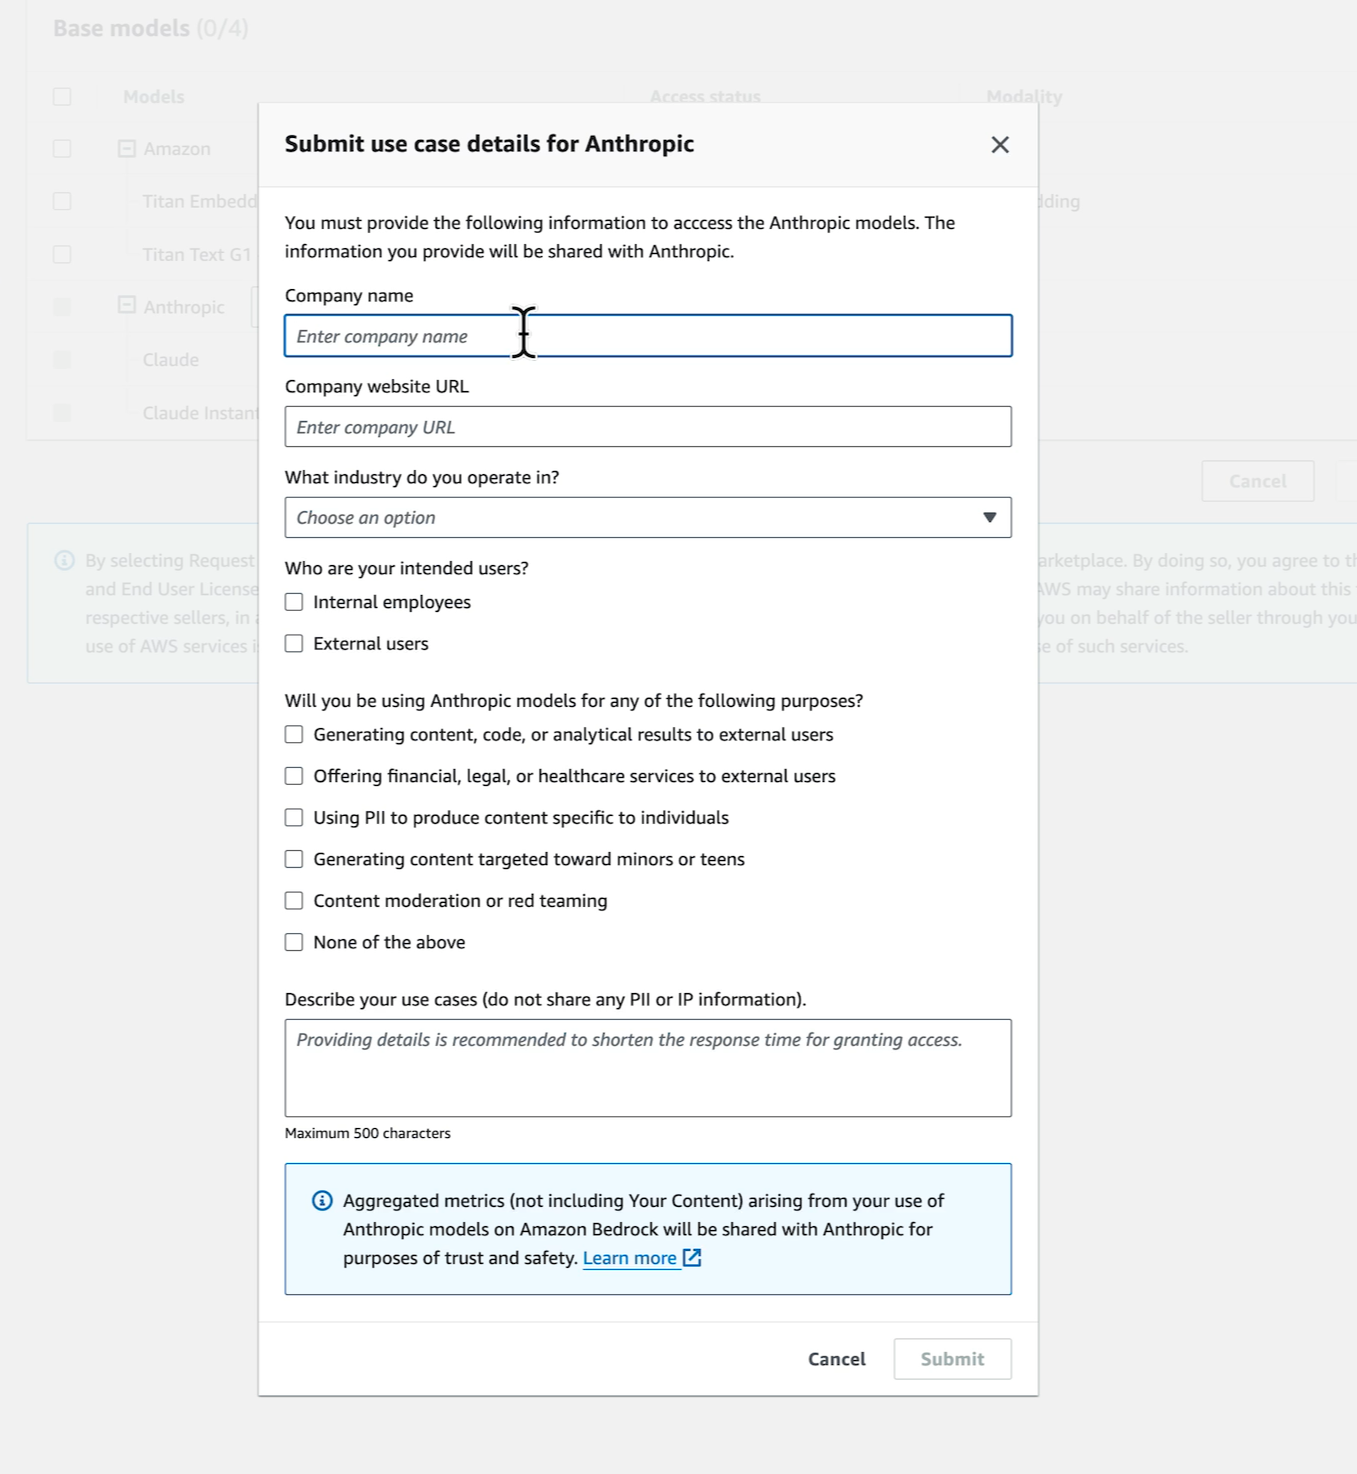
ユースケース送信画面が現れますので、画面の指示に従って送信します。
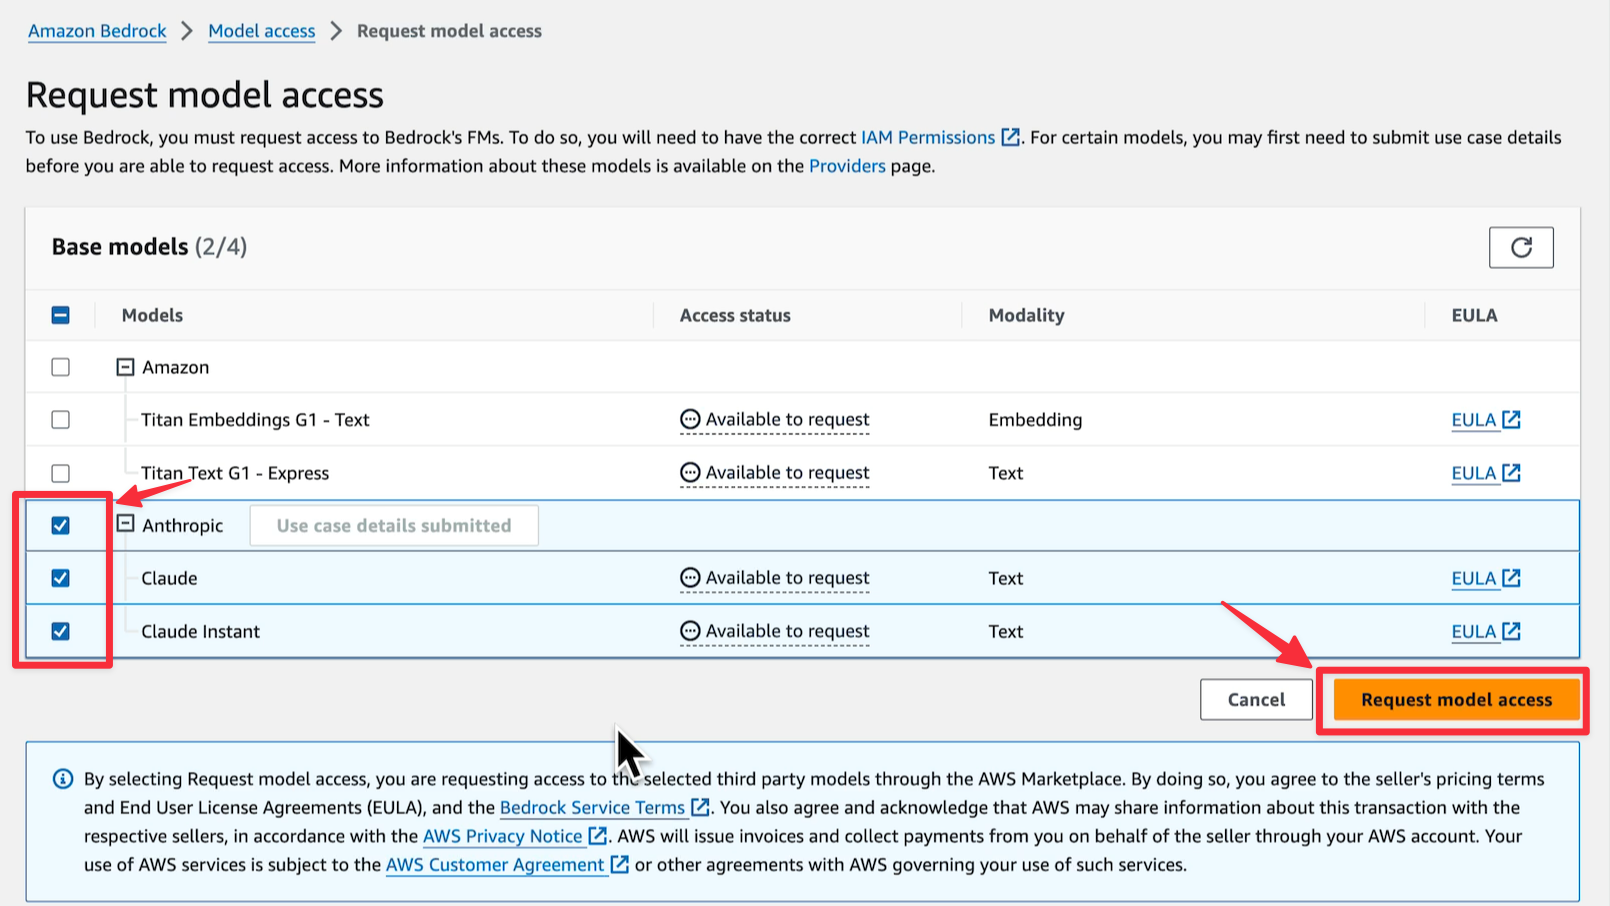
Request model accessの画面に遷移しますので、Anthropicのモデルにチェックを入れて、”Request model access”を押します。
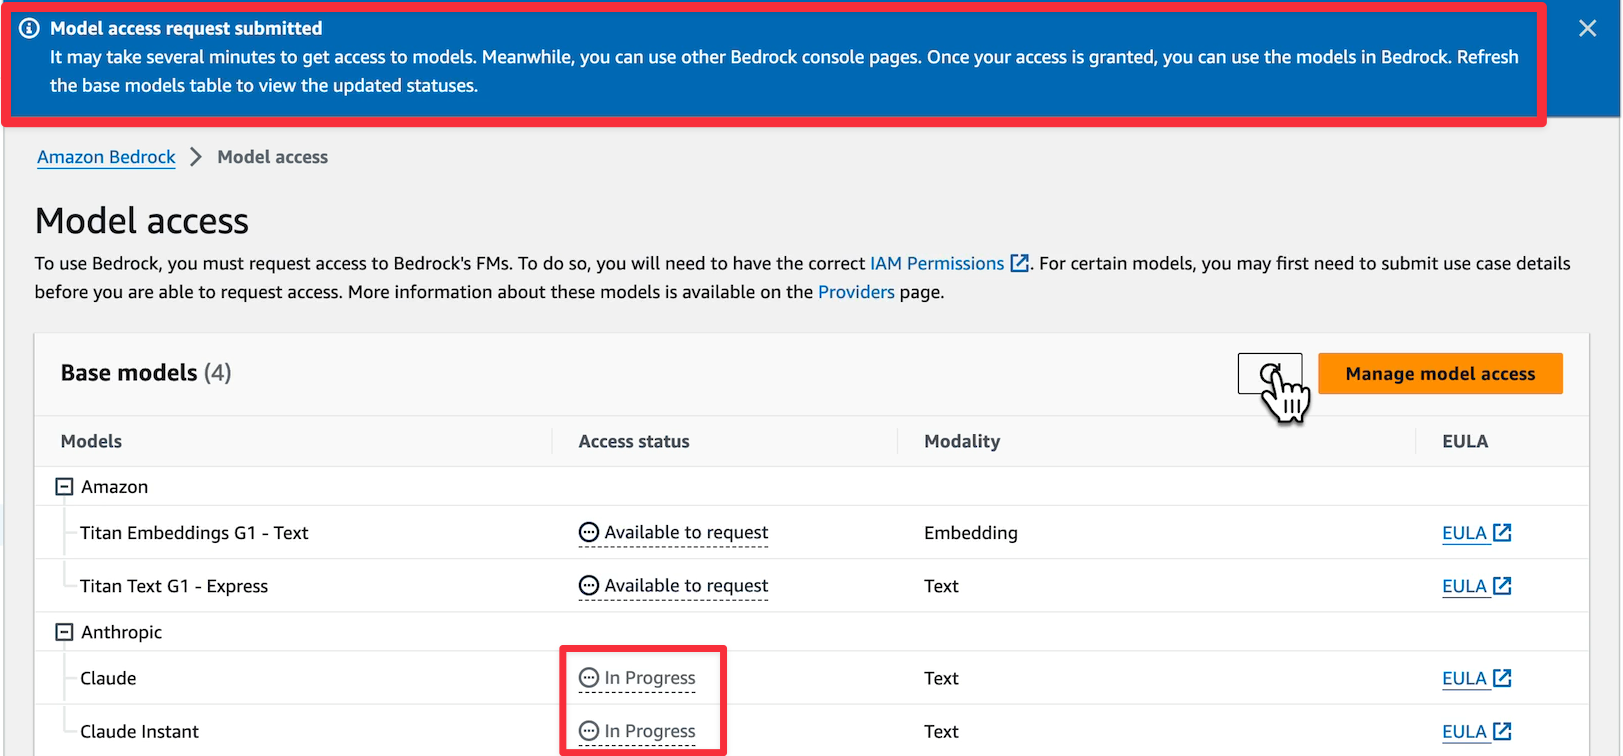
“In-progress”になった後、
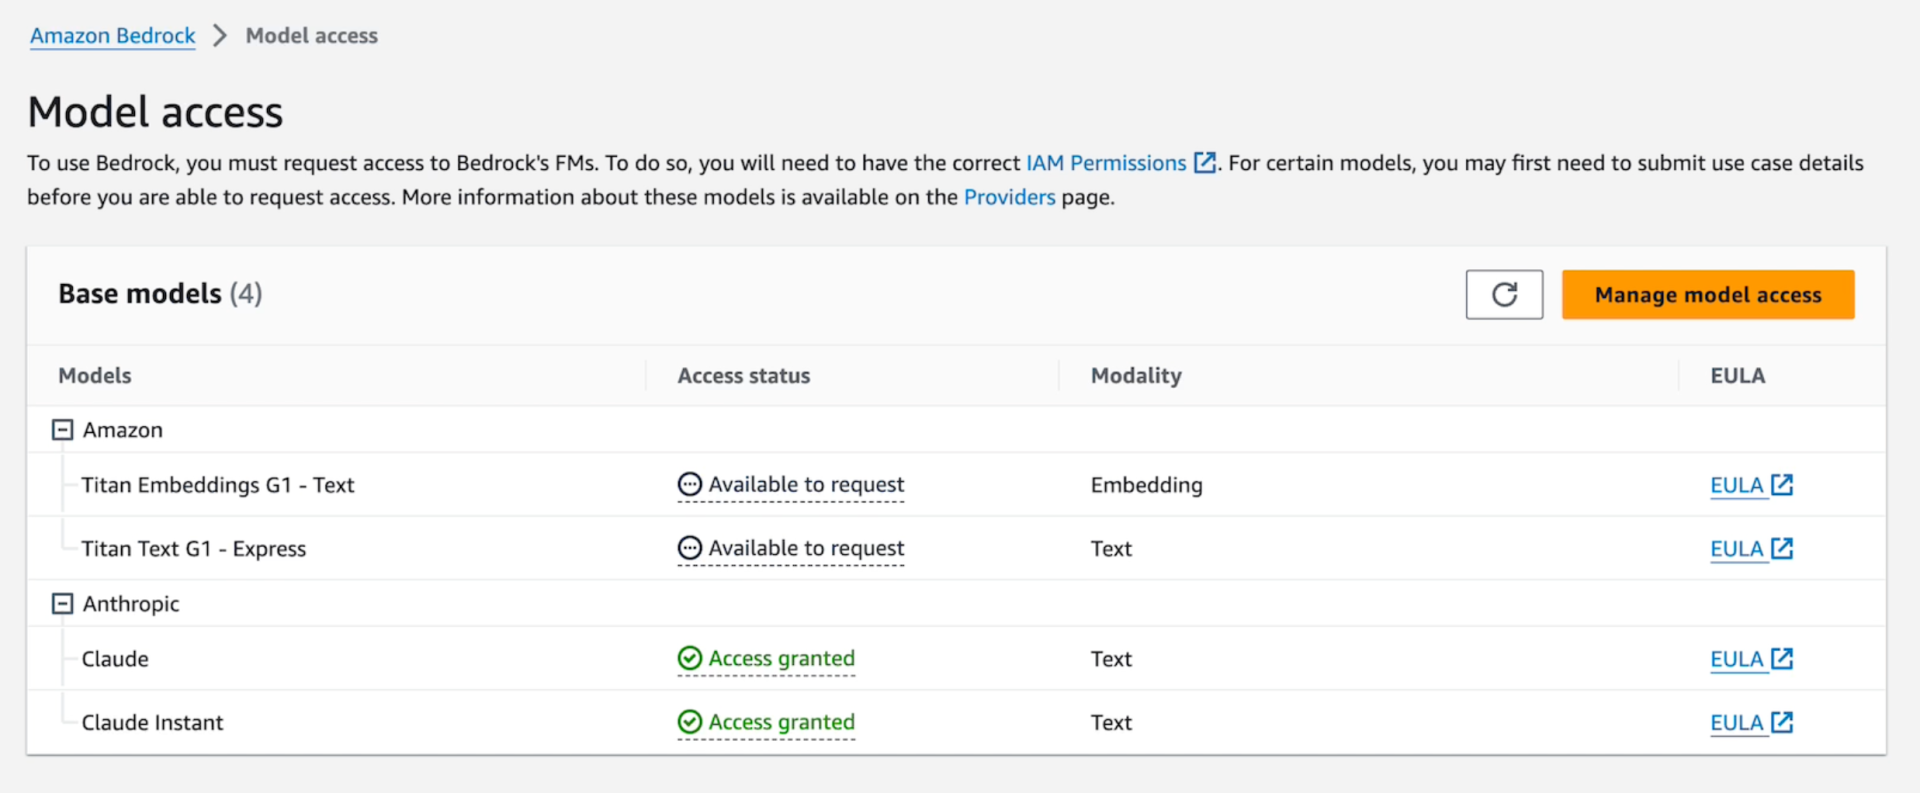
“Access granted”になります。
リージョンごとの利用可能なモデルの差異に注意
Amazon Bedrockでのモデルの利用申請は以上で完了で、AnthropicのClaudeのモデルが使えるようになりましたが、今回のテーマである”rain”のコマンドを東京(ap-northeast-1)リージョンでそのまま使おうとすると失敗します。
rainは内部的にはClaudeの”2″のバージョンを使うようになっている一方で、Amazon Bedrockの東京リージョンにおいてはClaudeの”2″が提供されていません。”2.1″のみ提供されています。(2024/01/08現在)そのためrainのコマンドが失敗します。
なので、”2″のバージョンが利用可能なバージニア(us-east-1)リージョンなどでモデルへのアクセス許可を追加し、rainのコマンドラインで使えるようにしてください。
バージニアリージョンでモデルを使えるようにしつつ、rainコマンドを実行する前に
export AWS_DEFAULT_REGION=us-east-1
Code language: JavaScript (javascript)
と言う形でコマンド実行リージョンを切り替えると言うのが一つの手かと思います。
※ユースケースの送信は1つのリージョンで行っていれば、他のリージョンで再度送信は不要でした。
rainのインストール
Amazon BedrockでClaude V2のモデルが利用可能になりましたら、rainのコマンドラインのインストールを進めます。
https://github.com/aws-cloudformation/rain
にガイダンスがありますので、解説は省きますが、今回検証用にCloud9上で行った際には以下のような手順を踏みました。
# 現時点の最新バージョンのZIPを取得
$curl -OL https://github.com/aws-cloudformation/rain/releases/download/v1.7.5/rain-v1.7.5_linux-amd64.zip
# ZIPを展開
$ unzip rain-v1.7.5_linux-amd64.zip
# Pathの通るディレクトリに移動
$ sudo mv rain-v1.7.5_linux-amd64/rain /usr/bin/rain
# バージョン確認
$ rain -v
Rain v1.7.5 linux/amd64
Code language: PHP (php)
Bedrockを使ったテンプレート生成
さて、上記の設定が済んだら早速テンプレートの生成をしてみましょう。
今回は
- パブリックサブネット1つ、プライベートサブネット1つがあるVPC
を作成させてみましょう。
rain build -pコマンドに指示を添えて実行します。
$ rain build -p "VPC with 1 private and 1 public subnet with necessary resources like routing"
AWSTemplateFormatVersion: 2010-09-09
Description: Create VPC with public and private subnets

Resources:

  VPC:
    Type: AWS::EC2::VPC
    Properties:
      CidrBlock: 10.0.0.0/16
      EnableDnsHostnames: true
      Tags:
        - Key: Name
          Value: !Ref AWS::StackName

  InternetGateway:
    Type: AWS::EC2::InternetGateway

  InternetGatewayAttachment:
    Type: AWS::EC2::VPCGatewayAttachment
    Properties:
      InternetGatewayId: !Ref InternetGateway
      VpcId: !Ref VPC

  PublicSubnet1:
    Type: AWS::EC2::Subnet
    Properties:
      VpcId: !Ref VPC
      AvailabilityZone: !Select [ 0, !GetAZs '' ]
      CidrBlock: 10.0.1.0/24
      MapPublicIpOnLaunch: true
      Tags:
        - Key: Name
          Value: !Sub ${AWS::StackName}-PublicSubnet1

  PrivateSubnet1:
    Type: AWS::EC2::Subnet
    Properties:
      VpcId: !Ref VPC
      AvailabilityZone: !Select [ 0, !GetAZs '' ]
      CidrBlock: 10.0.2.0/24
      MapPublicIpOnLaunch: false
      Tags:
        - Key: Name
          Value: !Sub ${AWS::StackName}-PrivateSubnet1

  PublicRouteTable:
    Type: AWS::EC2::RouteTable
    Properties:
      VpcId: !Ref VPC
      Tags:
        - Key: Name
          Value: !Sub ${AWS::StackName}-PublicRouteTable

  DefaultPublicRoute:
    Type: AWS::EC2::Route
    DependsOn: InternetGatewayAttachment
    Properties:
      RouteTableId: !Ref PublicRouteTable
      DestinationCidrBlock: 0.0.0.0/0
      GatewayId: !Ref InternetGateway

  PublicSubnet1RouteTableAssociation:
    Type: AWS::EC2::SubnetRouteTableAssociation
    Properties:
      SubnetId: !Ref PublicSubnet1
      RouteTableId: !Ref PublicRouteTable

  PrivateRouteTable:
    Type: AWS::EC2::RouteTable
    Properties:
      VpcId: !Ref VPC
      Tags:
        - Key: Name
          Value: !Sub ${AWS::StackName}-PrivateRouteTable
Code language: PHP (php)
実行結果としてYAMLの内容が直接出力されます。
なので実際の運用としてはシェルのリダイレクトなどを使って、ファイルに保存する形が良さそうです。
出力されたテンプレートがどれほど有効か各種lintやTaskCatでのテスト結果を見てみましょう。
テスト結果
yamllint
$ yamllint .
./cloudformation/VPC_made_by_rain.yaml
  1:1       warning  missing document start "---"  (document-start)
  7:7       error    trailing spaces  (trailing-spaces)
  13:20     error    trailing spaces  (trailing-spaces)
  29:34     error    too many spaces inside brackets  (brackets)
  29:48     error    too many spaces inside brackets  (brackets)
  33:20     error    trailing spaces  (trailing-spaces)
  40:34     error    too many spaces inside brackets  (brackets)
  40:48     error    too many spaces inside brackets  (brackets)
  44:20     error    trailing spaces  (trailing-spaces)
  50:16     error    trailing spaces  (trailing-spaces)
  53:15     error    trailing spaces  (trailing-spaces)
  67:22     error    trailing spaces  (trailing-spaces)
  81:22     error    trailing spaces  (trailing-spaces)
  86:20     error    trailing spaces  (trailing-spaces)
  102:1     error    too many blank lines (2 > 0)  (empty-lines)
Code language: JavaScript (javascript)
指摘が結構出てきてしまいました。YAMLの作法、流儀的なところもあるかもしれませんが、直しておきましょう。
cfn-lint
CloudFormationの観点でのlintですが、こちらは1件も指摘は出てきませんでした。
TaskCat
さて、上記までは記法上のチェックでしたが、実環境上にデプロイする形でテストするとどうなるのかTaskCatを使ってテストしてみます。
$ taskcat test run
 _            _             _
| |_ __ _ ___| | _____ __ _| |_
| __/ _` / __| |/ / __/ _` | __|
| || (_| \__ \   < (_| (_| | |_
 \__\__,_|___/_|\_\___\__,_|\__|


version 0.9.41
[INFO   ] : Linting passed for file: /home/ec2-user/environment/cfn-development/cloudformation/VPC_made_by_rain.yaml
[S3: -> ] s3://taskcat-output-xxxxxxxxxxxx/cfn-development/cloudformation/VPC_made_by_rain.yaml
[INFO   ] : ┏ stack Ⓜ tCaT-cfn-development-main-1cab16ad093644b48256fe27d80c6d2f                                                                          [INFO   ] : ┣ region: ap-northeast-1                                                                                                                      [INFO   ] : ┗ status: CREATE_COMPLETE                                                                                                                     [INFO   ] : Reporting on arn:aws:cloudformation:ap-northeast-1:xxxxxxxxxxxx:stack/tCaT-cfn-development-main-1cab16ad093644b48256fe27d80c6d2f/fbce80c0-ae2d-11ee-89c4-06556cb3ed55
[INFO   ] : Deleting stack: arn:aws:cloudformation:ap-northeast-1:xxxxxxxxxxxx:stack/tCaT-cfn-development-main-1cab16ad093644b48256fe27d80c6d2f/fbce80c0-ae2d-11ee-89c4-06556cb3ed55
[INFO   ] : ┏ stack Ⓜ tCaT-cfn-development-main-1cab16ad093644b48256fe27d80c6d2f                                                                          [INFO   ] : ┣ region: ap-northeast-1                                                                                                                      [INFO   ] : ┗ status: DELETE_COMPLETE                                                                                                                     [INFO   ] : Will not delete bucket created outside of taskcat taskcat-output-xxxxxxxxxxxx
Code language: JavaScript (javascript)
(一部マスク済み)
結果、エラーなく完了しました。
さらに追加で、TaskCatのテストを経たYAMLファイルをデプロイして、作られたパブリックサブネット上にEC2を建てたりもしましたが、問題なくパブリックサブネットとして機能できていました。
まとめ
期待通りBedrockの力を借りてCloudFormationのテンプレートを生成させることができました。
上記の例で言うとネットワークにまつわる10以上ものリソースを作成するためのテンプレートを文字通り数秒で作成することができました。Nameタグの表記が少し煩雑になっていたと言うところはあるのですが、それを鑑みても作業の取り掛かりとしては非常に便利だと思います。
なお、出力されるものに多少差異があるもののプロンプトは日本語にも対応しております。成果物を英語と日本語とで見極めながらにはなりますが、効率アップに寄与するのは間違い無いかと思います。
AI恐るべしですね。序盤のセッティングが少しだけ面倒でしたが、現実的に業務効率を高める強力なツールをひとつ手に入れたと思います。